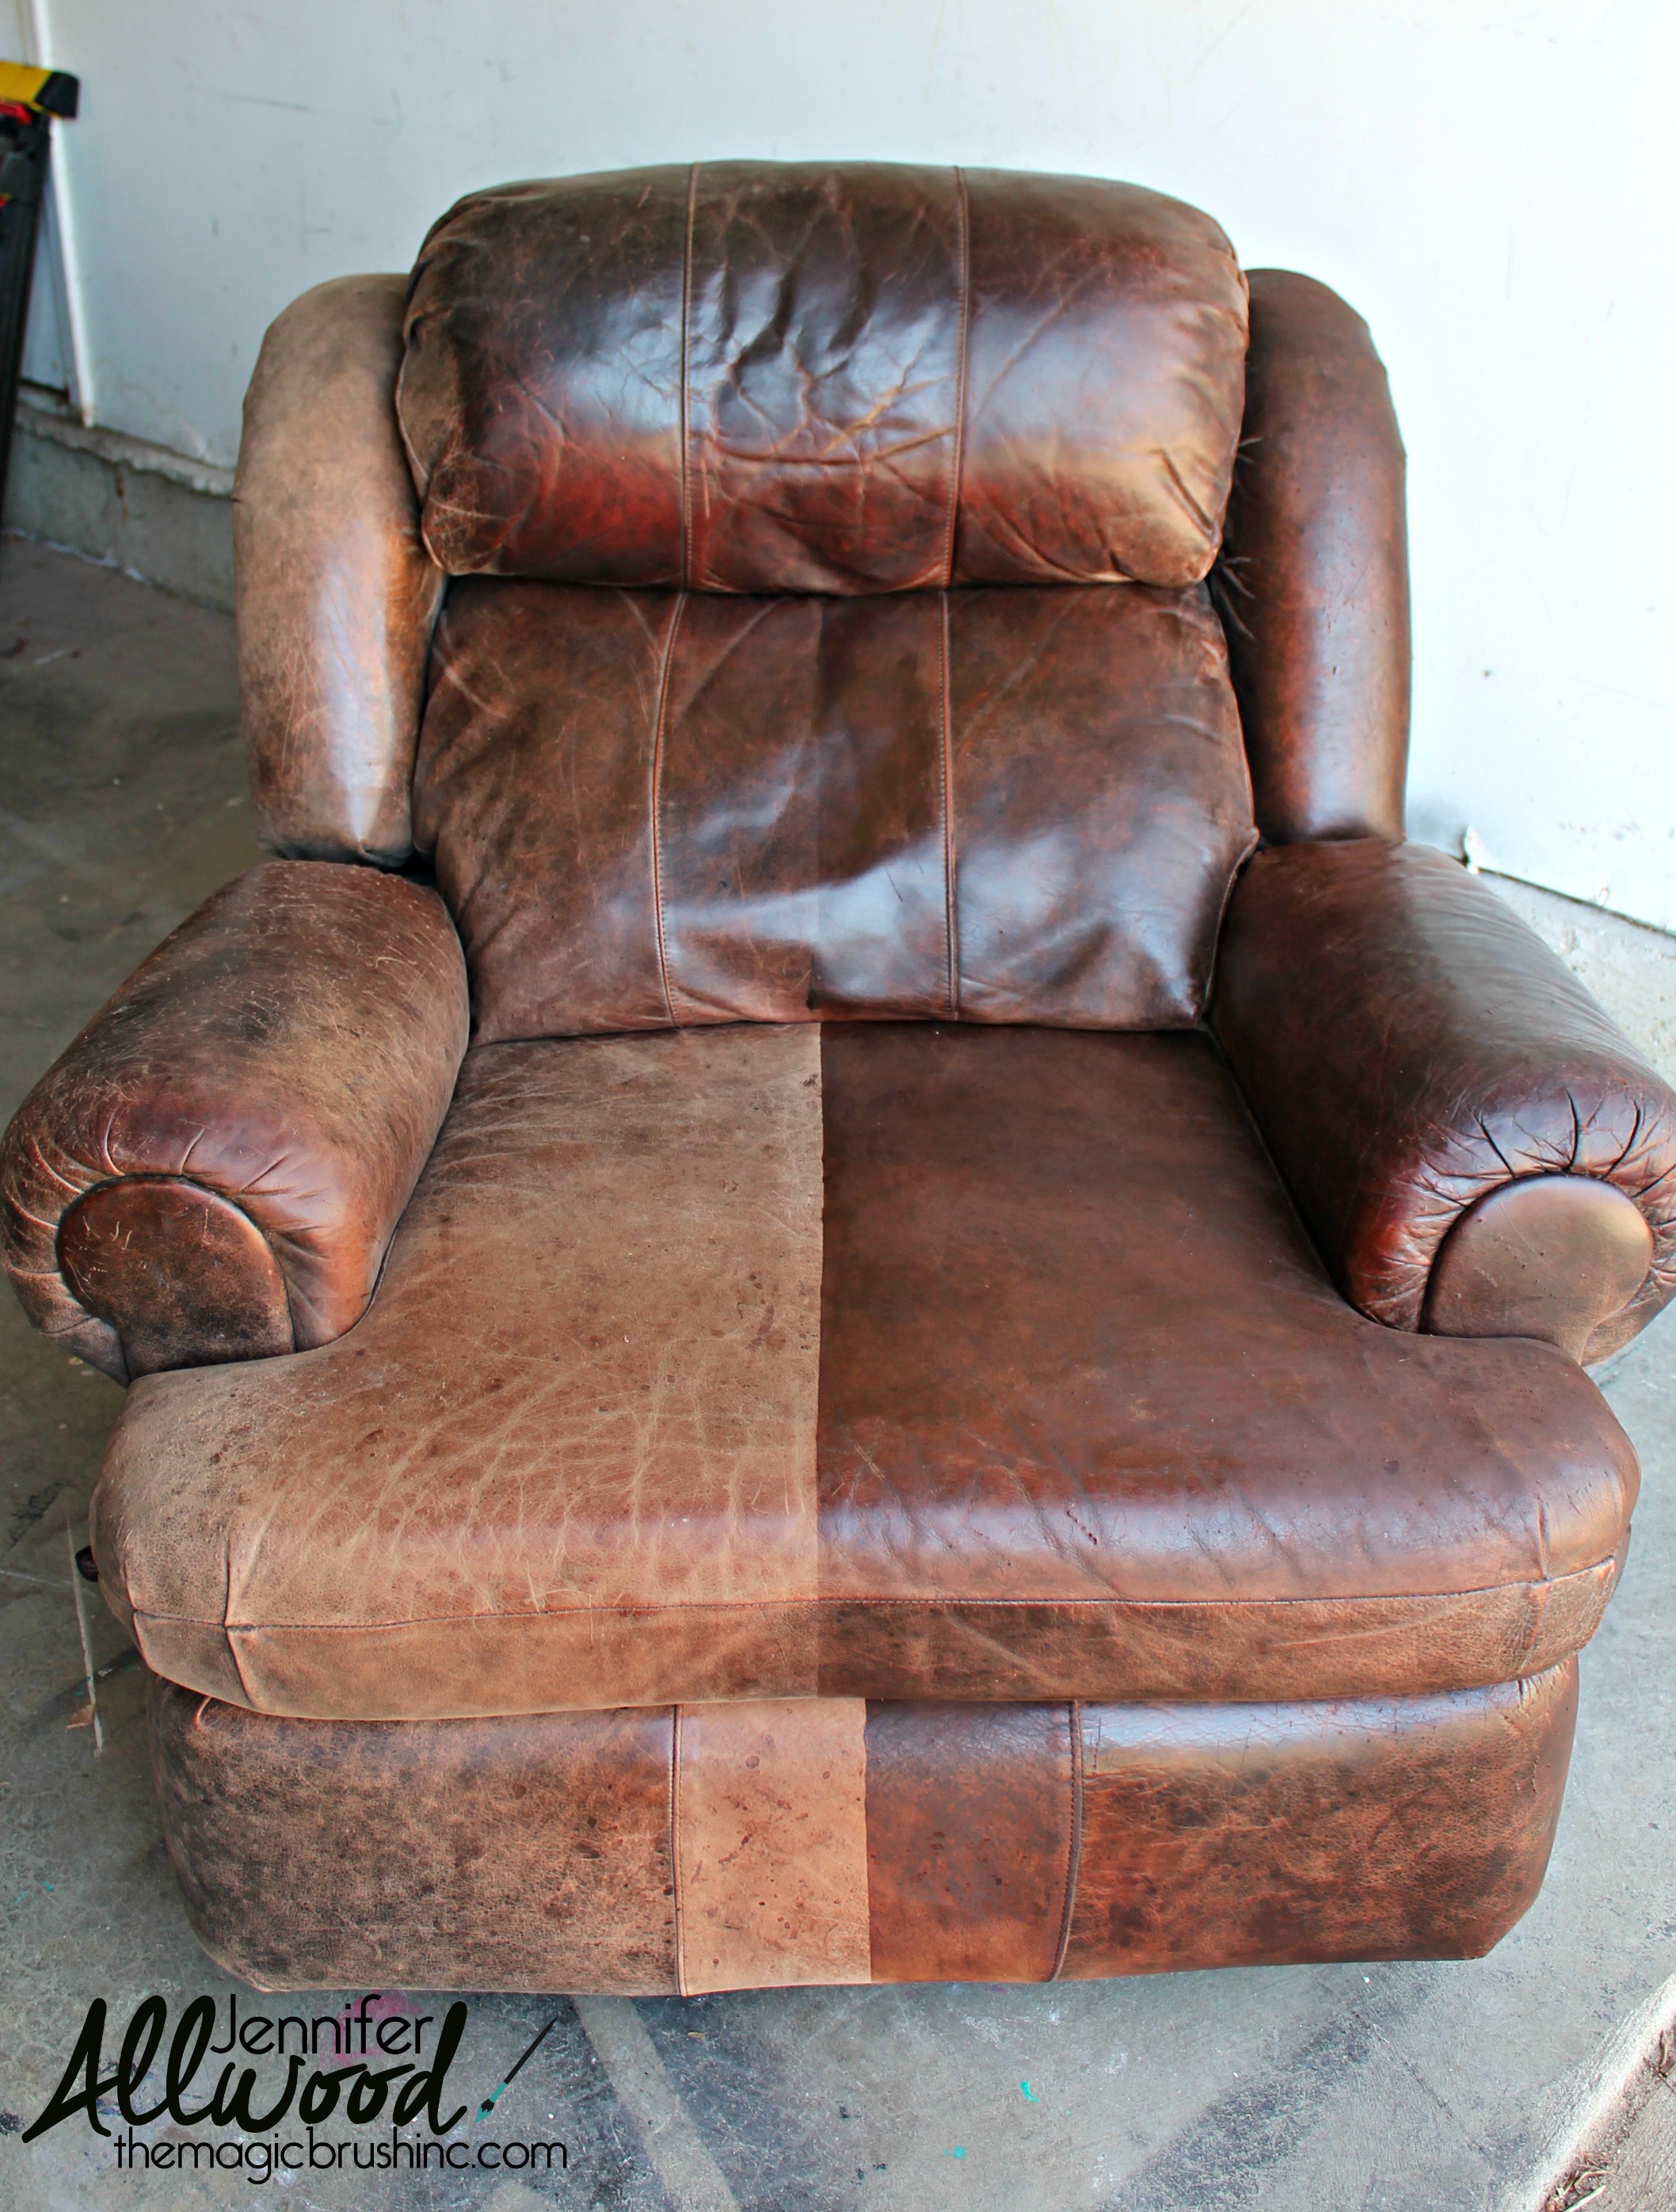

I bought this leather recliner off of Craigslist a few weeks ago just to show you all a new leather paint. Yep, that’s right. A leather PAINT. How many of you have leather furniture that looks just like this….. worn out in the butt area and faded where the sun hits it?? Notice also that the headrest area wasn’t faded…. just the rest of it. The chair was a mess.
This post contains affiliate links for products I use and LOVE! These are Amazon links from which I will make a small commission at no charge to you. Your purchase helps support my blog and share my painting adventures! Thank you!

I literally ran a line of tape right down the middle of this bad boy just so you could see the difference of the side I “painted” vs the side I did not. I know. Spectacular, isn’t it? lol.

Here is alllllllllllllllllllllllll you need:
- A sanding block if your leather has “snags” on it. Just try to sand them off. Some will improve and some just are what they are.
- A chipbrush that’s disposable (cuz’ ain’t nobody got time for washing oil based products out of brushes) and this is oil based.
- a rag (or 20 depending on your mess level).
- and ReLuv…. the magical leather product. You can order it on my affiliate link HERE. It comes in Mahogany, Ebony and Chestnut. I used Chestnut on this recliner and Chestnut is definitely their most popular. You may want to pick up one of my favorite chalk-type paint brushes while you’re shopping!

I started on the back of the chair and would suggest you do the same. Rule of thumb on any new project like this….. ALWAYS START IN AN INCONSPICUOUS SPOT. You can see the one darker panel is the one I started on. I started by brushing the Reluv on and then trying to rag it off. In was ridiculously warm in Kansas City for March so I was working outside. I would not recommend you work in the direct sun like I did. The leather was “thirsty” in spots and since it was hot, I had to work quickly. Too quickly for my taste so….

I got smart and took the chair back into the garage and then started sponging it on. I loved how that worked. Here is a worn out shoulder spot and you can see how much better it looked after one coat of Reluv, but it still needed a little of the product ragged on right in the center to make it all more even.

And here is the biggest change…… the seat and the footrest!!!! So good.
The Reluv goes on super fast and dries well and it does NOT FEEL painted afterwards. It needs NO sealer (and all the angels in Heaven are singing over that) and I was lounging in the chair on purpose at the Home Show just to prove that no, it does NOT come off on your clothes. Lol.
If you feel like watching a video of how quick and easy it goes on, I have one below.
Just please pretend that I don’t have stain splattered on my face and pretend my hair and makeup are done, ok???

Check out the before/after again. Isn’t that cool????? See how now the entire side of the chair matches the headrest. And that’s how it looked years ago when it was new.
Now if you don’t have a recliner that is worn out, what about a bar stool in your house? An ottoman? A briefcase? A handbag? Shoes even? Yes, it will work on all of those leather items!
Again, the link to go buy Reluv is HERE.
Let me know if you try it. Send me a before/after picture and I’ll feature it on my Facebook page! And don’t forget you can pin these photos to save for later!
Happy painting!
Jen
If you loved this simple update, check out my free video for 10 other ways you can update your home before dinner — many involving just a little paint!

Will this product work to change a sofa from Mahogany to Chestnut? Also, will it work on the bonded leather so much of today’s furniture is made of?
Love, love, love the idea!
I haven’t seen any product like this before, Jennifer. A good product to have in the tool-box. Thanks for the introduction. -Katie – A Fine Finish
What a big difference, that chair looks amazing. Makes me wish I had a leather piece that needs to be painted, haha. I think I will start looking for a chair. Thank you for sharing this amazing product with us.
Does this only work for real leather?
I have a beat up and much loved of white recliner. Will ebony or mahogany work to make it darker? I don’t want gray.
Either will make it darker! I would try a test spot first. Several coats will help it not go gray!
Good morning from Oklahoma Jen. BTW your hair and makeup looked great from my end. LOL I was actually searching for a way to patch a tear in my leather recliner. It is not huge but is on the foot rest and very noticeable. I ran across this web page and am so excited. I fell and broke my back in April and have spent a lot a lot of time in this recliner. I truly would be lost without it. Being a senior citizen and trying to live strictly on SS there’s not an option of buying a new one. I will definitely have my son-in-law try the painting idea ………… but hoping you have a brilliant idea of how I can patch the hole prior to painting. Keep up the good work girl you’re doing a great job and being very helpful. Claudia
What color would I use for mushroom leather?
Thanks lynne
Hello, just curious what color you would recommend on burgundy?? Any ideas & also need to know how many cans are needed!! Wanted to recover in navy but I ‘m sure it would prove to be costly!! Darker would be a good thing!! Nice job & find!!
Wow! What an amazing improvement. I am so with you on the disposable brush, too.
I have beutiful leather chir, ottamon and couch. My precious 2 yr old granddaughter found a black sharpie and used the chair cushion as her canvas. We googled all kinds of ways to get it off, none of them worked but tbey did manage to discolor it horrible. My son feels horrible since he was in charge of his daughter at the time and says he will buy me new furniture as soon as he can. Now, we all know how that will work, lol. Do you think this product would cover the black sharpie or do you have any other ideas? HELP!
Hi-will this work on poor quality leather-like you get from a discount furniture store?
That’s pretty cool. I have a red couch that is getting worn. I may have to try. Thanks for sharing this tidbit.
I gave my son a leather couch set that is a buttery yellow color. His dog scratched the couch up pretty bad. Would we be able to use the fabric paint to renew it? I’m pretty sure he’d love me forever if we could paint it red. He’s big on D.C. Comics.
Love your ideas!
Wichita KS
Can I change my leather couch chair and ottoman to black ?, it’s dark brown ? And what can you use on velvet ? Thanks ! Cindycindy
Looks good, but I am worried that the new paint might come off on clothes when sitting on the furniture. Any problem with this? Any staining or spots?
How’s it holding up 2 years later? No transfer on anyone? Have 2 olive green wingbacks I’d love to transform gray or black.
Does this leather paint work on Natucci leather (not sure of spelling). Leather cleaning products say not to use on this leather.