 So a few weeks ago I was at The Restyled Home blog and saw this adorable chandelier wall graphic. I posted a comment to the author that I wanted that chandelier! ( I luvvvvvvvv chandeliers and will blog about that one day!).
True to his word, he put the graphic in the mail immediately and I received it yesterday.
May I just say this is no wimpy graphic???? It is huge!
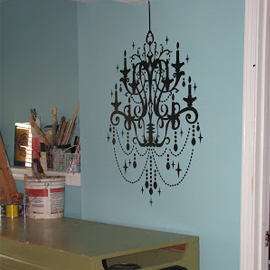
I’ve decided it was going in my paint studio ‘cuz you know the room is under “decorating construction”. And… I am in that room every day….so I will be able to enjoy it every day.
The decal was super easy to install. Any homeowner can do this.
First, measure/center where you would like to place the graphic. I do suggest using a level. The truth is… most of us “see crooked”. Unfortunately, often it isn’t until the project is done that we can finally see we were off a little bit. Just level it to be safe. Once it’s on… there is no adjusting it!
I put the chandelier where I can see if from the rest of the basement. It’s visible as long as my door is open. Once measured, tape it to the wall at the top only.

Next, you peel off the white backing paper. At first I was struggling being “decal dork”… but then I got my groove on and figured out how to balance this bad boy on my head as I barked orders at my 7 year old to “take the picture now”/”get your fingers off the lens”/”center the decal and not mom”…. etc.
P.S. This is Noah. A.K.A. my photographer for the day…. the only child of mine that you have not met. Isn’t he handsome?

Notice how I did a good job of not looking like I was barking orders…

After getting 1/2 of the backing or so off, you can softly lay the whole thing against the wall and pull the rest of the white backing down to get it off. Go slowly so that all of the pieces remain sticking to the clear paper and not the white backing. This picture is showing you the 1/2 done step.

Then you smooth out any bubbles and peel off the clear covering that is on the top. Notice I had some tiny pieces that stuck to the white. Those are so easy to just put in place once you have the covering off.

And Viola! Isn’t it lovely? It look me probably 15 minutes total! What a fun surprize project!

Check out Paul’s site at here for more wall graphics and art decals! Here are a few I love:


And check these cheetah polka dots! Hmmmmm… I’m imagining where they could go. Why am I picturing them in a girl’s bathroom????? They are very sassy!
Thank you so much Paul for your generosity! It’s obvious by your random act of kindness, quick turn-around time and the size/quality of the graphic that your company is destined for success!
On a side note, many of you know I am a contributor for Project Create A Home. They are starting a big giveaway tomorrow to win advice on anything from decorating to money management advice to home organizing advice to exercise advice, you get the idea! Head on over by clicking HERE and get signed up!
Blessings,
Jennifer
Oh, Jennifer that is positively ADORABLE!!! so’s your little man. What a great gift!!!!
Suzanne
Man! How awesome are you?????????? You are definitely someone who deserves this chandy candy! Their products are gorgeous. I will surely be keeping my eye out for those! Generosity is a good thing, isn’t it? I bet that just made your week/month/year!
~Misti
oh man…I might have to have one!! STINKIN cute, and aren’t they fun to put up…it is immediate gratification. I looks adorable.
LOVE the chandelier! I want one, just gotta figure out where I could hang it! The small girl and big flowers is cool too – and the dots are funky-fied fun! So glad someone blessed you back with kindness 🙂
Do you know how many hours I have spent looking for a darn chandelier decal that wasn’t from the UK????
I am glad you found/received/demoed it! I have the hardest time with these decals…you make it look so easy!!
This chandelier turned out great! I have several of these wall art decor pieces and they are fun and easy! And, your daughter’s room for your “Project” post is just incredible! You are SO talented!!! 🙂
i love the chandelier.
xo
Love that chandelier!! Gorgeous! you did a good job following directions, I am horrible at that!! 🙂 Looks perfect there…
Ohhh your son is adorable!! I love your chandy! It’s perfect with that blue wall!
So fabulous!!! I have been debating doing this to my library room (which I am in the process of putting together). The walls are a little bumpy, so not sure if it will work.